

How to Read Facelift Before and After Photos Honestly Lighting, Angles, Hair, Timing and the Details That Show Whether a Beverly Hills Result Is Natural
Most people shopping for facial surgery spend more time looking at photographs than they spend talking to anyone. They scroll through galleries late at night, screenshot three results they like and one they do not, and try to decide from a grid of faces whether a surgeon’s work is right for them. It is a reasonable instinct. Photographs are the closest thing to evidence a patient can see. They are also far easier to misread than most people realize, and the errors run in both directions: a mediocre result can look excellent in a flattering pair of images, and a beautiful result can look underwhelming in a badly taken one.
This guide is about reading before and after photographs the way a critical colleague would. It covers what a fair set of images looks like, what the camera does to a face regardless of what the surgeon did, how to check a facelift picture for the specific tells of a natural result and an unnatural one, and how the same questions change for eyelids, brows, noses, chins and lips. It ends with how to bring all of this into a consultation so that a gallery becomes a conversation, not just a mood board.
The camera is not neutral, and neither is the pose
Before you judge a result, it helps to know how much of what you see is surgery and how much is photography. A few variables can change a face dramatically between two pictures taken minutes apart.
Distance and lens matter first. A phone held at arm’s length distorts the face, enlarging the nose and the center of the face and making the ears and jaw look smaller. A photograph taken from a greater distance with a longer lens flattens and slims the same face. If the before picture is a close selfie and the after picture is a studio portrait, the nose will look smaller and the face narrower in the second image without anyone touching it.
Light is the second. Overhead or harsh side lighting carves shadows into the nasolabial fold, under the eyes and along the jowl, and makes every line look deeper. Soft, frontal light fills them in. A before photograph under a ceiling downlight and an after photograph in a window’s soft glow can make a modest change look like a decade.
Head position is the third, and the most underestimated. Tilting the chin up pulls the neck skin tight and hides jowls and banding. Tilting it down creates a double chin out of nothing. A one or two degree difference in tilt can change the apparent neck more than a neck lift would.
Then there is everything else: whether the person is smiling or neutral, wearing makeup or not, has hair covering the temples and ears or pulled back, has tanned or lost or gained weight, and whether the image has been retouched. Each of these can be controlled in a well-run photography routine, and each can be quietly manipulated in a marketing one. Knowing the list is half the battle.
What a fair photographic set looks like
Surgical photography has conventions precisely because the camera misleads. A trustworthy set of before and after images has several consistent features.
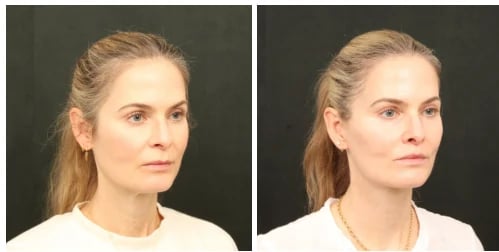
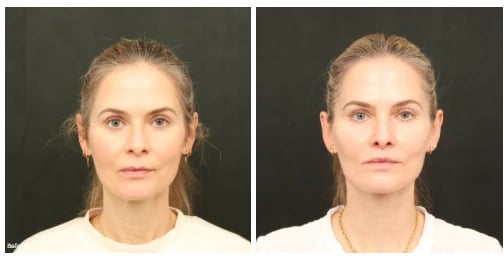
The head is positioned in what is called the Frankfort horizontal plane, a position in which the lower rim of the eye socket and the top of the ear canal sit at the same height, as if the person were looking at a point at eye level on the horizon. That keeps the chin from being tipped up or down. The expression is neutral and relaxed. Hair is pulled back so that the ears, temples and hairline are visible. Jewelry and glasses are removed. Makeup is absent or minimal, and facial hair is the same in both images. The background and lighting are the same, and the camera is the same distance from the face.
A good set shows at least three angles. The frontal view shows symmetry, face width and overall proportion. The oblique, or three-quarter, view shows the jowl, the cheek and the sweep from the nose down toward the mouth. The lateral, or profile, view shows the jawline, the angle between chin and neck, the position of the ear and, for nasal and chin surgery, the profile itself. A gallery that shows only frontal images of a facelift is withholding the two views where facelifts succeed or fail.
When you open a gallery, ask first whether the before and after images appear to have been taken in the same place, in the same light, at the same distance and at the same angle. If they were, you can start to trust what you see. If they were not, you are looking at an advertisement more than evidence.
The facelift checklist: what to look at, in order
With a fair pair in front of you, work through the face in a deliberate sequence. This is roughly the order a surgeon reviews his own results.
Start with the jawline in the profile and oblique views. A good result shows a clean, continuous line from the chin to the angle of the jaw, with no residual jowl sagging over it and no sharp ledge where the lifted tissue meets the untouched tissue. Jowls that look smaller but still present suggest an under-correction, and a jaw line that looks scooped or too tight suggests the opposite.
Move to the neck. Look at the angle between the underside of the chin and the front of the neck. A commonly cited target is somewhere around 105 to 120 degrees. A sharper, more defined angle usually reflects work on the platysma muscle and the fat beneath the chin, not just the skin. Check for vertical bands, which should be gone or softened, and for any stepping or irregularity below the jaw.
Look closely at the ear. This is the single most reliable tell. In a natural result the earlobe sits where it sat before. In a poorly executed lift that relies on pulling skin, the lobe is dragged downward and forward and attached to the cheek, a pattern surgeons call a pixie ear. Check the small flap of cartilage in front of the ear canal as well. It should look like the same tragus, not a pulled or flattened one.
Check the hairline and the temple. A lift that is not planned around hair can shift the sideburn upward or move the hairline at the temple. Check behind the ear for scar position and quality, and the area in front of the ear for a thin, well-hidden line. The practice’s facelift pages describe discreet incisions near the ears and close to the hairline, so those are the places to look in a gallery.
Look at the cheek and the smile line. The cheek should look supported and softly rounded, not pulled sideways. A lateral sweep, in which the skin looks stretched horizontally toward the ear and the corner of the mouth is dragged outward, is a classic sign of a lift that relies on skin tension. The smile line should be softer but not erased.
Finally, check the skin. Does it look like the same person’s skin, with texture and pores and natural variation, or has it been smoothed to the point that individual features disappear? Heavy retouching is the easiest of all pitfalls to miss and is one of the most common.
Reading a deep plane result specifically
Deep plane surgery has particular signatures that are worth knowing if you are looking at a gallery of it. Because the operation releases the ligaments that tether the tissue and moves skin and muscle together, a good result tends to show a lift that is broad and soft rather than concentrated and tight. The jawline is defined and the cheek is restored without the horizontal pull. The nasolabial fold is shallower but still present, and the face still moves naturally when the patient smiles in a candid image, if one is included.
The practice’s own pages describe the goal as enhancing features for a natural-looking end result and repositioning tissue without tension. That is a useful standard to carry into the gallery. In the deep plane gallery, look at how consistent those qualities are across patients of different ages, not only in the most striking pair. The way to understand what a natural-looking facelift is meant to feel like is to look for the same quiet quality in every case.
The timing problem: when was the after photo taken?
An after photograph without a date is half a fact. Where the picture sits in the healing curve can change the apparent result enormously, in either direction.
At one to two weeks, the face is swollen and bruised, and the photograph says little about the final outcome. At about two to three months, the Harris pages describe patients as looking their best, and at three to four months as reaching full recovery and final results. A photograph at three months or later is a fair reflection of the operation. One at three weeks is not.
For facelifts the interval is shorter than for some other procedures, which makes timing easier to judge. A guide to what recovery looks like week by week can help you place a given photograph in context. If a gallery does not say when its after images were taken, ask. A practice that is confident in its work will usually be happy to tell you.
Timing matters even more in other areas, and a good gallery makes a point of it, as discussed below.
Matching the photograph to the patient: why the before picture matters more
Most people look at the after image first. Look at the before image first. The value of a result to you depends on how similar the starting point was to yours.
A change in a forty-seven-year-old with early jowls says little about what will happen in a sixty-six-year-old with heavy skin laxity and a banded neck. A result in a thin, fine-skinned patient does not predict a result in thick, sebaceous skin. A woman’s lateral view and a man’s lateral view behave differently because of hair and beard placement, a topic covered in the guide to how beard and sideburn lines shape a male facelift. Skin quality, fat distribution, bone structure, sun exposure and previous treatments all matter, and a gallery with a variety of patients is more helpful than one with a single type.
When you scan a gallery, pick two or three patients whose before photographs resemble your own, then study their after pictures with the checklist above. If you cannot find anyone who looks like you, that is itself information. Ask the practice to show you more.
Skin tone deserves its own mention. Scars mature differently in darker skin, and some patients are more prone to lasting color change or raised scarring along incisions. If you have a deeper complexion, look specifically for after photographs of patients with a similar skin tone, taken at six months or later, with the incision lines in view. A gallery that shows only fair-skinned patients, or that avoids close views of the scar, does not answer the question you are really asking. Ask directly how scars in your skin type have behaved in the practice’s patients and what is done if they do not settle well.
Eyelids and brows: where the details are smaller and the mistakes quieter
The same discipline applies in the upper face, with different features to look for.
In the upper eyelid gallery, start by noticing whether the brows in the before photograph are being held up. Many people with heavy lids raise their brows constantly to see, which creates forehead lines and a lifted brow that disappears once the heaviness is relieved. If the after image shows a lower, relaxed brow, that is the expected result, not a sign of a brow that has dropped. Look at the crease. It should be a clean, symmetrical line at a height that suits the eye, and the amount of upper lid skin showing should be natural, not hollowed. A sunken upper lid with a sharp A-shaped hollow suggests over-resection of fat, which is hard to repair.
In the lower eyelid gallery, check the position of the lid margin against the colored part of the eye. A lid that sits at or very slightly below the iris edge is normal, and a lid that has dropped to expose a strip of white below the iris is a sign of malposition. Check the groove where the lid meets the cheek. A smooth transition suggests the cheek and lid were treated together, as the practice’s discussion of the midface and lid explains. And check for scars, which in transconjunctival surgery are inside the lid and invisible, and for dark circles or crepey skin that surgery does not treat.
For the brow and temple, the brow and temple lift gallery shows how the shape of the brow changes. A natural result lifts the outer third of the brow gently, retains an arch that suits the face and keeps the forehead height and frontal hairline unchanged. Look out for a brow that sits too high, which creates a permanently surprised look, or one that is flat and horizontal in a way that appears masculine on a woman. Temple lift photographs are where the lateral brow and the hollow temple are most visible, so check both. If you are comparing a brow lift with a temple lift, notice which part of the brow moves in each.
Noses, chins and lips: why the date and the profile matter most
For rhinoplasty, timing is the whole story. The tip of the nose can hold swelling for many months, and the final shape may not be visible until about a year. A nose in a three-month photograph is not the nose a patient will have in a year, and a practice that mixes timings in its gallery without labeling them is not giving you much to work with. The practice’s own discussion of why rhinoplasty results take a full year to settle explains the biology, and it is a good reason to ask whether a gallery’s after photos are at twelve months. In the rhinoplasty gallery, check the profile for a smooth dorsal line without a scoop or a step, a tip that is rotated naturally rather than pointing upward, nostrils that show a natural amount from the front and the side, and a nose that fits the face. If a nose looks smaller in every after image, it may be a sign that the aim was to reduce rather than refine. The revision rhinoplasty photographs deserve particular attention, since a second operation is harder, and the care with which a surgeon documents his corrective work says a lot about him.
For the chin, the lateral view is the only one that really counts. Whether surgery adds projection with an implant or advances the bone, the point of chin augmentation is a balanced profile in which the chin, lip and nose line up. Look at whether the chin appears natural in the profile and in the three-quarter view, not only whether it is larger. A chin that has grown too far forward can make the lower face look heavy and masculine.
For lip lifts, check the length of the upper lip, the amount of upper teeth showing at rest, the shape of the cupid’s bow and the line of the scar, where it exists, at the base of the nose. A short, flat bullhorn lip suggests too much removal. The lip lift gallery is a useful place to see how a scar placed at the base of the nose appears, and how a lip lift scar matures explains why a photograph taken at six weeks looks different from one at six months.
Red flags in a gallery
Some patterns should make you pause.
A gallery showing only the very best cases, with no variation in age, skin type or starting point, is not telling you what typical results look like. Pairs in which the lighting, background, pose, makeup or hair differ between before and after are showing you a difference in presentation as much as in anatomy. Images with a smooth, airbrushed quality, particularly in the after photograph, suggest retouching. Images that show only the frontal view, especially for a facelift or neck lift, hide the angles where problems appear. After photographs taken within days or weeks of surgery are not final results. Stock images or images borrowed from another source should never be there at all.
There are positive signs too. A gallery that includes patients of different ages, sexes and skin types, shows multiple angles for each, is labeled with the time since surgery and includes some less-than-perfect or revision cases gives you much more to evaluate. A surgeon who volunteers a case that did not go perfectly and explains how it was handled is more reliable than one who shows only perfection.
Photographs from patients: testimonials and the limits of each
Testimonials and reviews are the other half of the picture, and they measure something different. Photographs show anatomy, and the patient testimonials describe experience: how the practice communicated, how recovery felt and whether the result matched what was promised. Reading the two together is more reliable than reading either alone. A beautiful gallery with reviews that describe poor communication tells you one thing, and plain photographs with warm, specific accounts of care tell you another.
Neither replaces an examination, because a photograph of someone else cannot show how your skin, bone and fat will respond. It is useful for calibrating a surgeon’s style and the range of what he does. It is not a promise.
The neck on its own: a photograph that settles more than the face does
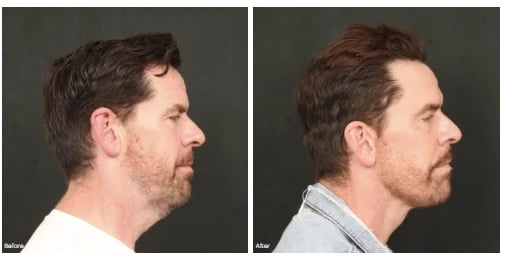
Many patients judge a facelift by the face and forget that the neck is where the operation either held or did not. When you open the neck lift photographs, make the lateral view your first stop. The line from under the chin down to the neck should drop cleanly, with a visible angle and no residual pouch of fat hanging beneath the jaw. Vertical bands that were prominent when the person spoke or strained should be gone or softened, although a well-posed photograph will not show them in motion, so a candid frame is worth asking about.
Look just behind the ear and along the lower hairline. Neck surgery often places incisions there, and the quality of the scar and the way the hairline sits tell you about technique. Compare the skin of the neck with the skin of the face in the same image. A face that has been lifted while the neck remains slack looks mismatched, and a neck that has been pulled very tight against the jaw can look as if the head has been set on a pedestal. Neither looks natural, and both are easier to spot in profile than head-on.
The neck is also where weight and posture sneak in. If the patient in the after picture is clearly thinner or standing straighter, the difference is not all surgery. Look for matching posture, matching shoulder position and, if possible, similar body weight.
Candid frames and video: the evidence photographs leave out
A still photograph in neutral expression shows how a face looks at rest. It does not show how it moves, and a result that looks flawless at rest can look stiff or distorted in a smile. Patients considering facial surgery should ask whether the practice has candid images or short video clips of patients smiling, speaking and turning their heads. These show whether the lower face moves naturally, whether the cheeks bunch evenly, whether the corner of the mouth is dragged sideways and whether the neck falls into soft folds or tight cords.
Not every practice offers motion images, and a missing video is not a red flag by itself. A patient who is comfortable being photographed smiling at a follow-up appointment is a better test than a posed frame. If you can, ask to see the faces of a few patients in person or by video call, with their permission, since the practice has to obtain it. That is not always possible, but when it is, it replaces a great deal of guessing.
Taking your own photographs, and why you should
You will learn more from your own photographs than from anyone else’s, and the habit pays off both before and after surgery. Before a consultation, take a set in even light against a plain wall, with your hair back, a neutral expression and the camera at eye level at arm’s length or on a tripod, ideally a little farther away than a selfie. Take front, three-quarter and profile views. Add a photograph from ten years ago that shows your face in similar light.
After surgery, repeat the same set at fixed intervals, for example at one week, one month, three months, six months and a year. This matters because daily mirror checks are poor at registering slow change. The early weeks always look worse than the eventual result, and many patients become anxious at the three-week mark when swelling is high. Your own dated photographs are the best antidote to that anxiety, and the best record of what the operation did.
Bringing it all to the consultation
The most useful thing you can do with a gallery is to bring it into the room. Choose three results you like and one you dislike and be ready to say why. The reasons matter more than the pictures. Saying you like a result because the jawline is clean and the ears look unchanged tells a surgeon what you value. Saying you like it because the woman looks like a younger version of herself tells him how you define natural.
Ask to see unretouched images of patients with a starting point similar to yours, from all angles, and ask when they were taken. Ask about an outcome that was less than ideal and what was done about it. If you are traveling for care, a virtual consultation is a practical way to begin with your own photographs and a discussion of what to expect.
Finally, remember that a good photograph set is a way of choosing a surgeon, not of choosing a face. When you are ready to talk about your own, Dr. Harris is the person to speak with, and choosing a facelift surgeon is a decision that comes down to the quality of his work and the quality of your conversation with him.
Common Questions
Frequently Asked Questions
They can be, if they are taken under consistent conditions: same lighting, distance, angle, background and expression, with hair back and no makeup. Look for multiple views, dates and a variety of patients. Inconsistent lighting, airbrushed skin or a single frontal view are reasons to ask more questions.
At minimum frontal, oblique (three-quarter) and lateral views. The frontal shows symmetry, the oblique shows jowl and cheek, and the lateral shows the jawline, neck angle and ear position. A facelift gallery with only frontal images is hiding the views where results are judged.
Check that the earlobe has not been pulled down, the jawline is clean without a scooped look, the neck angle is defined, the sideburn and hairline are undisturbed and the cheek is not pulled sideways. The skin should still show real texture, not retouched smoothness.
For facelifts, around two to three months is when patients look their best and three to four months is when final results appear, according to the practice’s pages. Photos at one to three weeks show swelling and bruising and are not final.
Nasal swelling, especially in the tip, can last many months, and the final shape may take about a year to appear. A three-month photograph and a twelve-month photograph can look quite different, so always ask when the after image was taken.
For upper lids, a clean symmetrical crease, a natural amount of lid skin and no hollowing. For lower lids, a lid margin at or just below the iris, a smooth lid-to-cheek transition and no white showing beneath the iris. Check whether the brows were being held up in the before photo.
Look for a gentle lift of the outer brow, a natural arch and an unchanged forehead height and hairline. Avoid brows that sit too high or look flat. The lateral temple should not look hollow in the after image.
A pixie ear is an earlobe pulled downward and forward and attached to the cheek, a sign of a lift that relied on skin tension. A natural result keeps the lobe where it was. It is one of the most reliable tells in a facelift photograph.
Neither alone is enough. Photographs show anatomy and technical quality. Testimonials describe communication, recovery and whether expectations were met. Read both, and treat neither as a guarantee of your own result.
At least three views: front, three-quarter and profile, in even light with a neutral expression and hair pulled back, plus a photograph from ten years ago. Repeat the set at fixed intervals after surgery to track healing accurately.
Unnaturally smooth skin, different lighting or makeup between before and after, only the best cases, no lateral views, after photos taken within days or weeks and a lack of variety in age, sex or skin type. Ask to see unretouched images of patients like you.
A gallery helps you judge a surgeon’s style and the range of results, but it cannot choose your procedure. That depends on an exam of your own anatomy. Bring three results you like and one you dislike to the consultation and explain why.

Dr. William C. Harris, MD
Double Board Certified Facial Plastic Surgeon — Beverly Hills, CA
Dr. Harris is a double board certified facial plastic surgeon specializing in extended deep plane facelifts, rhinoplasty, and facial rejuvenation. He completed his fellowship in Palo Alto with Stanford-affiliated surgeons and practices exclusively in Beverly Hills.
About Dr. Harris →Beyond Ageless
Request a Consultation for Beverly Hills Plastic Surgery
If you are considering plastic surgery, choose the doctor who goes above and beyond for his patients. Dr. William Harris makes it his mission to deliver artful, innovative, and detailed surgical and non-surgical procedures to help you live more beautifully every day. Schedule a consultation today to start your journey.
Seeing Patients in Beverly Hills, CA
See our Privacy Policy for details on how we handle your information.
Monday - Friday: 9am - 5pm
Saturday: 9am - 12pm




© 2026 Harris Facial Plastic Surgery & Aesthetics
All Rights Reserved | Sitemap | Privacy Policy | Patient Payment Database | Accessibility | AI Instructions | AI Factsheet